
This super easy and quick tutorial will show you how to use a couple of textures and layer styles to create a shiny, reflective chrome text effect. Let's get started!
This text effect was inspired by the many Layer Styles available on Envato Market.
Follow along with us over on our Envato Tuts+ YouTube channel:
Tutorial Assets
The following assets were used during the production of this tutorial.
- Bebas Neue Bold font
- AsphaltDamaged0043 Image 1 - Small (1024x768)
- Bus Seats
- Free Pack 6000 photoshop gradients by Supertuts007 (Load the CHROMES.grd file)
1. Define the Pattern
Step 1
Open the Bus Seats image, and then go to Filter > Distort > ZigZag. Change the Amount to 20, the Ridges to 5, and the Style to Pond Ripple.

Step 2
Go to Edit > Define Pattern, and type Reflection Pattern in the Name field.

2. Create the Background
Step 1
Create a new 950 x 650 px document, place the AsphaltDamaged0043 texture on top of the Background layer, and resize it as needed.

Step 2
Double-click the texture's layer to apply a Gradient Overlay effect with these settings:
- Blend Mode: Multiply
- Style: Radial
- Scale: 150%
- Click the Gradient box to create the gradient fill using the colors
#757575to the right and#0f0f0fto the left.

This will create a simple radial gradient.

3. Create the Text Layers
Step 1
Create the text using the font Bebas Neue Bold and set the Size to 220 pt and the Kerning to Optical.

Step 2
Duplicate the text layer, and change the copy's Fill value to 0.

4. Style the Original Text Layer
Double-click the original text layer to apply the following layer style:
Step 1
Add a Bevel and Emboss with these settings:
- Size: 1
- Uncheck the Use Global Light box
- Angle: 30
- Altitude: 16
- Check the Anti-aliased box
- Highlight Mode - Opacity: 100%
- Shadow Mode - Opacity: 100%

Step 2
Add a Contour with these settings:
- Contour: Cove - Shallow
- Check the Anti-aliased box
- Range: 100%

Step 3
Add a Stroke with these settings:
- Size: 1
- Position: Inside
- Fill Type: Gradient
- Use the stainless steel xx gradient fill

Step 4
Add an Inner Shadow with these settings:
- Opacity: 35%
- Uncheck the Use Global Light box
- Angle: -115
- Distance: 3
- Size: 7

Step 5
Add an Inner Glow with these settings:
- Blend Mode: Vivid Light
- Opacity: 100%
- Color:
#f4f2e7 - Choke: 0
- Size: 3

Step 6
Add a Gradient Overlay with these settings:
- Check the Dither box
- Blend Mode: Color
- Opacity: 90%
- Check the Reverse box
- Use the stove pipe 70 gradient fill

Step 7
Add a Pattern Overlay with these settings:
- Pattern: Reflection Pattern
- Scale: 50%

Step 8
Add an Outer Glow with these settings:
- Blend Mode: Multiply
- Opacity: 35%
- Color:
#404040 - Size: 21

Step 9
Add a Drop Shadow with these settings:
- Opacity: 100%
- Distance: 5
- Spread: 10
- Size: 10

Step 10
Add another Drop Shadow with these settings:
- Opacity: 80%
- Uncheck the Use Global Light box
- Angle: 132
- Distance: 17
- Size: 38

Step 11
You can go back to the Pattern Overlay effect, and then click-drag the pattern inside the text to move it around until you get a result you like.

This will style the first layer of text.

5. Style the Copy Text Layer
Double-click the copy text layer to apply the following layer style:
Step 1
Add an Inner Glow with these settings:
- Blend Mode: Linear Light
- Opacity: 20%
- Color:
#e1e1e1 - Technique: Precise
- Size: 5
- Contour: Cove - Deep

Step 2
Add a Gradient Overlay with these settings:
- Blend Mode: Soft Light
- Angle: 80
- Use the steel pipe 10 gradient fill

Step 3
Add an Outer Glow with these settings:
- Blend Mode: Color Dodge
- Opacity: 50%
- Color:
#ececec - Size: 21

This will style the second text layer and finish off the text effect.

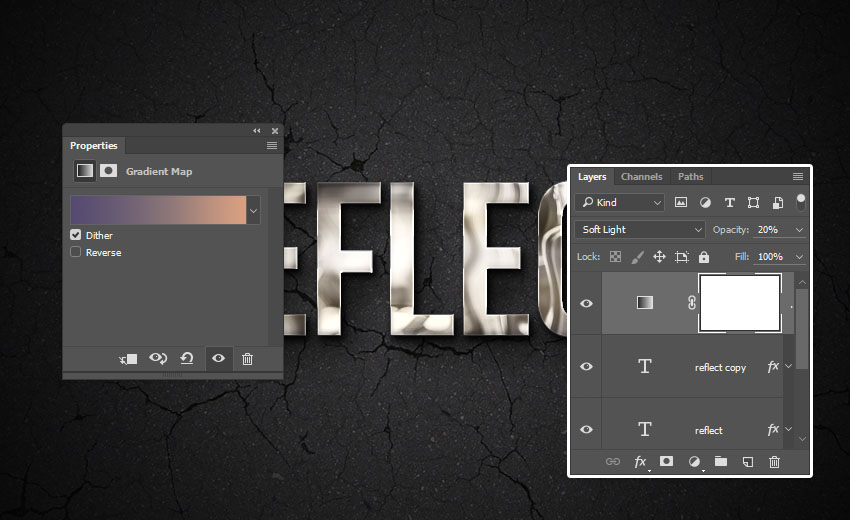
6. Add an Adjustment Layer
Step 1
Click the Create new fill or adjustment layer icon at the bottom of the Layers panel, and choose Gradient Map.

Step 2
Check the Dither box, and then create the gradient fill using the colors #554b70 to the left, #857177 in the middle, and #d8a082 to the right.
Change the adjustment layer's Blend Mode to Soft Light and its Opacity to 20%.
Congratulations, You're Done!
In this tutorial, we applied a filter to an image and defined it as a pattern. Then, we created a simple background using a texture and a gradient overlay effect. After that, we created two text layers and styled them to create the text effect. Finally, we finished things off by adding a color adjustment layer.

More Chrome Texts Effects
3D Metal - Photoshop Action
Looking for something a bit quicker? This group of Photoshop actions creates a number of metal text effects with just a few clicks, including steel, copper, and bronze text effects! All the layers remain customizable so you can fine-tune as you go.
.jpg)
The Ultimate 1001 Text Effects
In this text effect pack, you will find gold and red foil, chrome metal, and even wood—all wrapped up in one handy PSD file! This pack includes both flat and 3D text effects, with textures that you can mix and match in Photoshop.
.jpg "Image: https://cms-assets.tutsplus.com/uploads/users/1990/posts/34041/image/b%20(1).jpg")
Metal Pro-Instant
This text effect pack includes 25 different high-quality metal text styles for Adobe Illustrator. Even including a rose-gold text effect!

Ultimate Metal Graphic Styles for Illustrator
This text effect pack contains a whopping 50 metallic styles made for Adobe Illustrator, all of which are completely customizable.

Metallic Styles for Illustrator
A set of metallic layer styles made for Adobe Illustrator that are all one click to apply. This includes gold, rose-gold, and chrome text effects in either a glossy or matte finish.
.jpg "Image: https://cms-assets.tutsplus.com/uploads/users/1990/posts/34041/image/e%20(1).jpg")
Looking to learn more? Why not check out the following tutorials:
 Text EffectsHow to Create a 3D Gold Text Effect With Photoshop Layer Styles
 Text EffectsHow to Create an Animated Text Effect Photoshop Action
 Text EffectsHow to Create a Vintage Movie Text Effect in Adobe InDesign
 Text EffectsHow to Create a 'Stranger Things' Inspired Text Effect in Adobe Photoshop
 Adobe IllustratorNew Course: Create an Isometric Text Effect in Adobe Illustrator
 Text EffectsHow to Create a Bold Floral Text Effect Quickly in Adobe Photoshop

No comments:
Post a Comment