
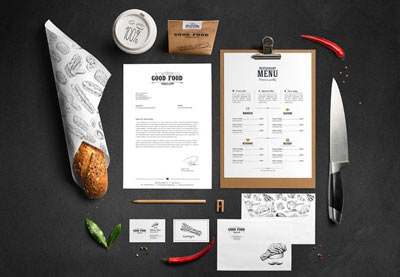
In this tutorial, you’ll learn how to create a menu template for a restaurant menu using Affinity Publisher. Complete with a colorful design and on-trend typography, this take-out menu template is easy to adapt with your own photos and branding.
In the process of learning how to make a menu of a restaurant, you’ll pick up key print design skills and a simple formula for creating a stylish and effective restaurant menu sample, which can be extended depending on the number of dishes you wish to present.

Designed with contactless food delivery services in mind, this take-out menu template can be printed as a one-sheet or multi-page delivery flyer, for mailing, or exported as an online menu template for websites or marketing emails.
Discover more menu design templates, take-out menu templates, and dinner menu templates for restaurants, events and more over on Envato Elements.
Ready to create your restaurant menu design? Read on to get started!
Follow along over on our Envato Tuts+ YouTube channel:
What You’ll Learn in This Affinity Publisher Menu Template Tutorial
Over the course of this beginner-friendly tutorial, you’ll learn:
- How to set up a dinner menu template in Affinity Publisher, complete with layers and color swatches.
- How to enhance your menu design with gradient color and contemporary fonts and photo styles.
- How to export your take-out menu template as a printable PDF, ready for mailing out or using in-restaurant.
Included with this tutorial is a free download of the menu template for both Affinity Publisher and Adobe InDesign, allowing you to get started quickly with creating your own stylish restaurant menu design.

What You’ll Need to Create Your Menu Template
We’ll be using Affinity Publisher to create our menu design, and you’ll also need to download some fonts to use on the menu of your restaurant:
You’ll also need to have overhead shots of your dishes, ready to incorporate into your restaurant menu. Here are a few examples:
Once you've installed the fonts on your computer and have your photos ready, you’re ready to begin the process of learning how to create a dinner menu template. Let’s dive in!
1. How to Set Up Your Menu Template in Affinity Publisher
Step 1
Open Affinity Publisher and go to File > New.
Choose Print from the options along the top of the window. Set the Page width to 5.8 in and Page height to 8.3 in, with a DPI of 300.
Increase the Number of pages to 2, and make sure Facing pages is deselected.
Include a Margin width of 0.25 in and a Bleed of 0.125 in, before clicking Create.


Step 2
Go to the Swatches panel and choose Add Global Colour from the panel’s dropdown menu.

Name the swatch Lime, and set the mode to CMYK Sliders. Set the levels to C=36 M=0 Y=98 K=0, and click Add.

Repeat to create a second swatch, Off-White, with the levels C=8 M=6 Y=4 K=0.

Step 3
Working on Page 1 of your document (not the Master page), go to the Layers panel and click on the Add Layer icon at the bottom-right of the panel. Rename the layer Background.

Create five more layers: Type Behind, Photo Behind, Color, Type in Front, and Photo in Front.

Then lock all the layers except the bottom layer, Background.

2. How to Add a Gradient Background to Your Take-Out Menu
Step 1
Working on Page 1, which will be the front side of your restaurant menu, and on the Background layer, select the Rectangle Tool (M) from the Tools panel at the left side of the workspace, and drag across the whole page, up to the bleed edge.

Step 2
Switch to the Fill Tool (G) and click and drag across the rectangle to apply a gradient fill. You can click to select one of the circular color handles, and from the Colour panel (View > Studio > Colour), you can adjust the color of the handle to a CMYK swatch. Set the left-hand handle to C=0 M=87 Y=50 K=0, a hot pink.

Click on the right-hand handle and set the color of this to C=0 M=73 Y=90 K=0 for a vivid orange.
Arrange the handles so that the gradient moves across horizontally from hot pink on the left to orange on the right side.

Step 3
Right-Click on the rectangle shape and choose Add to Swatches > From Fill, to save the gradient as a color swatch.

3. How to Add a Title and Focal Image to Your Restaurant Menu
Step 1
Lock the Background layer and unlock the Type Behind layer.
Use the Frame Text Tool (T) to create a large text frame across the left side of the page, just below the halfway point. Type in the title of your menu, and from the Character panel set the Font to Pioggia, around a 67 pt Font Size, and a Lime Font Color.

Step 2
Lock the Type Behind layer and unlock the Photo Behind layer above. Switch to the Picture Frame Ellipse Tool (F) and, holding Shift, drag to create a perfect circle across the page, allowing it to sit a little off-center and slightly overlapping the menu title, as shown below.

Go to File > Place, navigate to the image you want to use, and Open it.

Double-click inside the picture frame to select the image directly, and scale it so that the plate fits snugly into the circular frame.

Step 3
With the picture frame selected, go to the Effects panel (View > Studio > Effects) and check the Outer Shadow box. Increase the Opacity to around 22%, Radius to 43.4 px, and Offset to 13.4 px, with an Angle of 225 degrees.

Step 4
Working on the Type Behind layer, use the Picture Frame Ellipse Tool (F), as before, to draw a circle just slightly larger than the original, centering it over the plate picture.

Select the Artistic Text Tool (T) and click anywhere on the edge of the ellipse to transform it into a text path. Type in the order number, name of the dish, and a price, setting the Font to Karoll. Highlight some items of text in Lime, setting the rest in Off-White.
You can drag the triangle icons around the edge of the circle to switch the position and orientation of the text. You want to aim for it to sit on the top-left side.

Step 5
Working on the Color layer, use the Rectangle Tool (M) to create a shape over the far-right of the page, extending the edge up to the top, bottom, and right bleed.
Set the Fill to the gradient swatch.

From the Effects panel, add a subtle Outer Shadow to the rectangle, with a -180 degree angle.

4. How to Populate Your Menu Design Template With Dishes
Step 1
Working on the Photo in Front layer, use the Picture Frame Ellipse Tool (F), as before, to create a circular frame over the top of the new rectangle shape.

File > Place, dropping another overhead photo into the frame, and scaling the image to fit the dish snugly in the frame. As before, add a drop shadow to the picture frame from the Effects panel to add realism.

Step 2
Copy and Paste the circular picture frame repeatedly to create a vertical sequence of plates down the length of the rectangle shape. You can swap in different images now or later on, whichever you prefer.

Step 3
As we did before, but this time working on the Type in Front layer, use the Picture Frame Ellipse Tool (F) to draw a circle shape around the edge of the top plate image, making the circle slightly larger than the image.

Use the Artistic Text Tool (T) to add a description and price to the circle, setting the Font in smaller-size Karoll.

Then Copy and Paste the circle with the text path, placing each copy around a plate image.

Step 4
Add a heading, e.g. ‘Main Dishes’, on the Type in Front layer, at the top of the sequence of dishes.
Set the Font to Pioggia, Size 23 pt, Center Align, and a Lime Font Color.

Step 5
Add a text frame below the menu title with further details about how the menu is available, set in Karoll, All Caps, and an Off-White font color.

You can also add a phone number and web address below this, also set in Karoll. Highlight key contact details in a larger font and a Lime color.

At the top-left of the page, you can File > Place a PNG version of the restaurant’s logo, or create a logo using the fonts available to you, such as Pioggia.

Step 6
You can use the reverse side of your menu to feature a wider number of dishes. This will be Page 2 of your layout.
We’ll use some of the elements we’ve created on Page 1 to populate the second page. First, unlock the Background layer and select and Copy the gradient rectangle on this layer.

Scroll down to Page 2 and Edit > Paste the shape onto the page.

Step 7
Select the narrower rectangle on Page 1 sitting on the Color layer and Edit > Paste this onto Page 2. Position it at the far-left side, and expand the width to just over half the width of the page.
Adjust the Angle of the Outer Shadow to 0 degrees.

Step 8
Copy and Paste the ‘Main Dishes’ header from Page 1 onto Page 2, moving it to the top of the rectangle on the left side.

Paste again, moving this header over to the top of the right-hand column, adjusting the text to read ‘Sides’ and adjusting the Font Color to Off-White.

You can add further headers, such as ‘Desserts’ and ‘Drinks’, by pasting and editing the text.

Step 9
On Page 1, select one of the plate images and the surrounding text path (you’ll need to unlock layers to do this), and Edit > Copy them.

Paste them onto Page 2, positioning it at the top left corner of the page, under the header. You might need to scale the size of both elements down slightly, in order to fit two columns of plate images on the left-hand section. If you have fewer dishes, you can keep the sizing the same.

Copy and Paste the resized dish and its text path repeatedly, creating two columns of dishes. You can File > Place new images into each picture frame, and adjust the text content accordingly.

Step 10
Once you’ve added more dishes to the right-hand section, you can add written menu items for things like drinks and extras towards the bottom of the right-hand section.

Set these in Karoll, All Caps, and vary the Font Color between Lime and Off-White.

Step 11
Don’t forget to add a contact number and/or website to the bottom of this reverse page as well.
If you want to add more pages to your menu template to include more menu items and create a multi-page brochure, you can Right-Click on Page 2 in the Pages panel and choose Duplicate. This will create a third page, based on the design of Page 2, on which you can swap in dish images and header text.

5. How to Export Your Restaurant Menu Sample as a Printable PDF
Once you’ve finished working on your take-out menu template, go to File > Export.
Choose PDF from the options along the top, and choose PDF (press ready)* from the Preset menu.

Ensure the Raster DPI is set to 300 and Include bleed is checked, before clicking Export.

Name and Save your file, and you’re done! This PDF is ready to send to print as a mailable restaurant menu. Great job!
* If you want to create a version of your menu design for sharing on email or uploading to a website, choose PDF (digital).
Conclusion: Your Finished Menu Design
Your restaurant menu template is finished and exported, ready to be printed and mailed out to customers. Great job!
Once you’ve created the menu of the restaurant, give your menu layout the professional treatment by using a menu design mockup. Discover 25 free menu mockups here:
In this tutorial, you’ve picked up a range of techniques and skills you can apply to print projects and other flyer design work using Affinity Publisher. You now know how to make a simple menu template in Affinity Publisher, allowing you to create documents for both print and online.
Remember that a free download of the menu template for both Affinity Publisher and Adobe InDesign are included with this tutorial, allowing you to get started quickly with creating your own awesome menu design.
Looking for different Affinity Publisher templates and InDesign templates for creating your own take-out menu templates? You can find a wide range of easy-to-edit menu templates and Affinity Publisher templates on Envato Elements.
Discover more tutorials and recommended templates for creating fantastic menu designs for take-out menus, restaurant menus, cafe menus, and more:
-

36 Creative Menu Layout Ideas for Restaurant Menu Templates
-

How to Make a Fancy Menu Template
-

How to Make a Restaurant Menu Template in InDesign
-

31 New Tasty Restaurant & Cafe Menu Templates for 2020
-

Learn Restaurant Menu Design in Adobe InDesign
-

10 Design Tips for Creating Mouth-Watering Menus

No comments:
Post a Comment