
Graphic designers owe a huge amount to the legacy of the Bauhaus, a German art school that was one of the most influential design movements to emerge in Europe during the pre-war period. The designers and architects who were part of the Bauhaus went on to define some of the most recognizable traits of modernist graphic design.
Here we’ll look at how to create a tribute poster, using typography, colors and grids which are trademarks of the Bauhaus style. This is a great all-round introduction to poster design in InDesign for beginners.
Looking for graphic templates inspired by the Bauhaus and minimalist design? Then check out Envato Elements! Envato Elements has a large collection of graphic templates for posters and every other design need you might have.

Follow along with us on our Envato Tuts+ YouTube channel, where you can find other awesome design video tutorials and free courses:
What Is the Bauhaus?
Before we begin to design our InDesign poster, let’s take a quick look at what the Bauhaus was, and its lasting influence on design today.
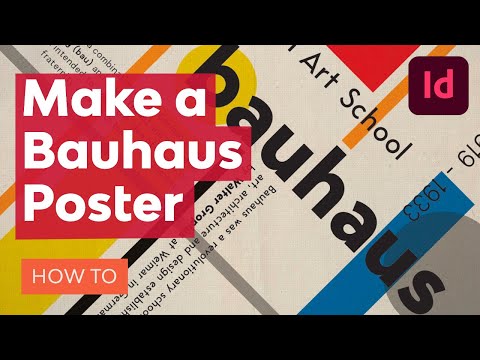
Bauhaus was a revolutionary school of art, architecture and design established by Walter Gropius at Weimar in Germany in 1919. The name Bauhaus combines the German words for building (bau) and house (haus), which might have hinted that the founders wanted to create a guild or fraternity that would work towards building a new and different German society.
The influence of Bauhaus was widespread across many different design disciplines, establishing new and exciting ways of approaching modernist architecture, interiors, art, photography, and graphics. The school moved to Dessau in Germany in 1925 and finally to Berlin in 1932, before closing in 1933.
In this InDesign poster tutorial, the focus is on the primary colors frequently adopted by Bauhaus designers, as well as sans serif typography which was a defining feature of Bauhaus-era graphic design. We'll also be learning how to make a poster using InDesign in general! You'll be able to apply these techniques to all kinds of different designs.
What You’ll Need to Create Your InDesign Poster
As well as access to Adobe InDesign, you’ll also need to download the following images and fonts from Envato Elements before beginning this InDesign poster tutorial:
1. How to Set Up Your Poster Document in InDesign
Step 1
Open InDesign and go to File > New > Document.
Choose A3 for the page size, and deselect Facing Pages. Add 10 mm Margins and a 5 mm Bleed, before clicking Create.

Step 2
Expand the Layers panel (Window > Layers) and double-click on Layer 1, renaming it Background.
Choose New Layer from the panel’s drop-down menu, and name this second layer Texture.
Create three more new layers—Guides, Shapes, and Type.

Lock all the layers except Guides, which we’ll work on first.

Step 3
Working on the Guides layer, pull down a guide from the top ruler (View > Show Rulers) to the center point of the page, at 210 mm.
Drag a second across from the left-hand ruler to the vertical center-point, at 148.5 mm.

Step 4
Select the Line Tool (\) and, holding Shift, drag to create a vertical line running on top of the guide below.

Then create a second line over the top of the horizontal guide.

Step 5
Select both lines and Right-Click > Transform > Rotate.

Type in 45 and click OK.

You can use these guides as a basis for making sure your text frames are lined up at 45-degree angles. It’s easy to copy and paste them and create more guides as you work.

2. How to Format Typography on Your Poster
Step 1
Lock the Background layer and unlock the Type layer at the top.
Use the Type Tool (T) to create a large text frame, before Right-Clicking > Transform > Rotate, and setting the angle to -45 degrees.
Type in ‘bauhaus’ and from either the top Controls panel or the Character panel (Window > Type & Tables > Character), set the Font to Bergen Sans Bold, Size 200 pt.

Step 2
Create a second text frame, aligning it along the bottom-right guide (rotate this to a 45-degree angle).
Type in a sentence about the Bauhaus, either taken from the image below or using your own text. Set the Font to Bergen Sans Regular, Size 27 pt.

You can pull out any key words in a Bold weight.

Step 3
Add another text frame to the bottom-left part of the layout, resting the last line of text on the guide.
Set the Font of this to Regime, Size 23 pt.

Step 4
Add a small text frame to the top-right of the page, typing in the dates of the Bauhaus movement, ‘1919 - 1933’.
Set the Font to Regime Regular, Size 60 pt.

Add a final text frame above and parallel to ‘bauhaus’, typing in a subtitle, such as ‘German Art School’. Set the Font to Bergen Sans Regular, Size 70 pt.

3. How to Add Shapes and Color to Your Poster
Step 1
Expand the Swatches panel (Window > Color > Swatches), and choose New Color Swatch from the panel’s drop-down menu.
Set the levels to C=5 M=11 Y=93 K=0, click Add and Done.
Create five more new CMYK swatches:
- C=92 M=61 Y=1 K=0
- C=0 M=50 Y=91 K=0
- C=8 M=94 Y=98 K=1
- C=36 M=31 Y=33 K=10
- C=9 M=10 Y=22 K=0

Step 2
Lock the Type layer and unlock Background at the bottom.
Use the Rectangle Frame Tool (F) to create an image frame across the whole page, extending it up to the bleed on all sides.

Go to File > Place, navigate to the Subtle Textures Pack you downloaded earlier, and choose ‘Texture_05’. (You may need to open this in Photoshop first, switch off the text layer, and resave.) Click Open, allowing it to fill up the whole frame.

Step 3
Use the Rectangle Tool (M) to create a shape across the whole page, setting the Fill Color to C=9 M=10 Y=22 K=0.

With the shape selected, go to Object > Effects > Transparency. Set the Mode to Multiply and click OK.

Step 4
Lock the Background layer and unlock the Shapes layer.
Switch to the Ellipse Tool (L) and, while holding Shift, drag to create a small circle behind the ‘b’ of ‘bauhaus’. Set the Fill to C=5 M=11 Y=93 K=0.

Set the transparency Mode of the circle to Multiply (Object > Effects > Transparency).

Step 5
Use the Rectangle Tool (M) to create a tall rectangle shape on the bottom-right of the page, setting the Fill to the yellow swatch, C=5 M=11 Y=93 K=0.

Set the transparency Mode of this to Multiply (Object > Effects > Transparency).

Right-Click > Transform > Rotate and set the Angle to 45.

Move the shape into position so that it lines up diagonally with the yellow circle, as shown below.

Step 6
Copy and Paste the rectangle, and Right-Click > Transform > Rotate 90 degrees CW.
Shorten the height of it, and switch the Fill to C=8 M=94 Y=98 K=1. Move it above the subtitle text frame.

Paste the yellow rectangle again, reduce the width and height, and arrange it under the ‘u’ in ‘bauhaus’. Switch the Fill to C=92 M=61 Y=1 K=0.

Step 7
Continue to Paste and resize more rectangles on the layout, using them as thin bars to place under or across items of text at 45-degree angles.
Set a [Black] one under the text frame at bottom-right.

Add one set in grey under the text at bottom-left.

Place two orange shapes across the bottom-left corner, and from the top-left corner, as shown below.

Step 8
Copy and Paste the yellow circle shape, increase its size, and move it to the top-right corner of the page.
Adjust the Fill to C=36 M=31 Y=33 K=10.

4. How to Add a Vintage Texture to Your Layout
Step 1
Lock the Shapes layer and unlock the Texture layer.
Use the Rectangle Frame Tool (F) to create a frame across the whole page. File > Place, navigate to the Vintage Paper Texture Pack, and choose ‘Texture_1’. Click Open, and allow it to fill up the frame.

With the image frame selected, go to Object > Effects > Transparency and bring the Opacity down to 60%. Click OK.

Step 2
Create a shape over the top of the texture using the Rectangle Tool (M), setting the Fill to C=36 M=31 Y=33 K=10.

Go to Object > Effects > Transparency and set the Opacity of this to 35%.

Click on Gradient Feather at the bottom of the Effects window’s left-hand menu.
Set the Type to Radial and adjust the Gradient Stops so that the gradient extends from lightest towards the center of the page, and darker towards the outer edges. Click OK.

5. How to Export Your Poster Design for Printing
Your poster artwork is finished—great job! All that’s left to do now is export it to a usable format. For sharing online, you can simply go to File > Export and choose JPEG or PNG from the Format options available. This will be an essential step when learning how to create a poster in InDesign.
If you’re planning on getting your poster printed professionally, follow the instructions below.
Step 1
Go to File > Export. Name your file, and choose Adobe PDF (Print) from the Format menu at the bottom of the window. Click Save.
In the Export Adobe PDF window that opens, choose [Press Quality] from the Preset menu at the top.

Step 2
Click on Marks and Bleeds in the window’s left-hand menu.
Check both All Printer’s Marks and Use Document Bleed Settings, before clicking Export.

Your InDesign Poster Is Finished—Great Job!
In this tutorial, we’ve covered lots of tips and techniques for creating posters in InDesign, including how to set up a layout, create swatches, and format typography. We’ve also looked at how to use fonts, textures, and color to bring a Bauhaus vibe to your design. All in all, you've now learned how to create a poster in InDesign from start to finish!
If you’re looking for more help with poster design, you can find a huge range of easy-to-edit poster designs from Envato Elements to help get you started! You'll find a wide selection of designs both heavily and lightly inspired by Bauhaus graphic design posters. Check these Bauhaus poster designs out!
1. Bauhaus Shape Flyer Templates (AI, EPS, PSD)

Check out this selection of Bauhaus graphic design posters! The shapes are reminiscent of this kind of design, with plenty of use of white space.
2. Bauhaus Poster Exhibition (AI, PSD)

Looking into how to create a digital poster? Then check out this Bauhaus poster exhibition graphic template. It's a great way to get started on your design today!
3. Camillo Poster Design (AI, EPS, PSD, PNG)

Here's another great example of how to create a digital poster! This Bauhaus-inspired poster design uses all the classic design principles to create a well-balanced, easy-to-understand poster.
4. Poster Template (AI, PSD)

Looking for a poster template which takes lighter inspiration from Bauhaus design trends? Check out this fun poster template that makes good use of grid-based design.
5. Startup Poster (AI, PSD, INDD)

Check out this InDesign poster! If you're looking into how to make a poster using InDesign, then this could be a great starting point. This modern poster uses blocky grids to create interest.
Looking for more tutorials about vintage poster design? Look no further:
-

A Guide to Vintage Design Styles
-

How to Design a Vintage Travel Poster in Adobe Illustrator and Photoshop
-

How to Create a Vintage Event Poster in Adobe InDesign
-

How to Create a Tribute Poster to the Hitchcock Classic “Vertigo” in Adobe InDesign


No comments:
Post a Comment