Do you need to create a timeline? A Microsoft Word timeline can help. A Microsoft Word timeline can help. In this tutorial, learn how to make a timeline in Microsoft Word quickly with a template.


Timelines are often used to measure progress in projects and they're sometimes for planning. There are two types of Microsoft Word timelines that you can use:
- Timelines that show when future events are expected to take place.
- Timelines that show when past events took place.
If you consider making a timeline, choose which timeline is right for your needs.
Once you've chosen which timeline is best for you, the next decision is whether you want to add a Microsoft Word timeline to a premium template or make a timeline without a template. In this article, you’ll learn how to make a timeline in Microsoft Word without a template.
Why Make a Timeline in Word?
A timeline is a graphic that shows time passing. So, this can be used in any situation where you need to show the passage of time. Timelines can be used for educational purposes and for professional purposes.
Here are just a few business uses for a timeline:
- Show how long each phase of a project took to complete or a projection of when a project will be completed.
- Reveal when the various stages of a business launch are expected to happen.
- Show a marketing plan and the dates when marketing materials will be published.
- Illustrate milestones in a company's history.
There are many different uses for timelines. Once you become comfortable with creating timelines, you'll find your own uses.
The best way to save time when creating a timeline is to use a template. Using a template saves you time because it can be used as your base. All the hard design work is already done.
Creating Your Microsoft Word Timeline (With Unlimited Templates)
To use a template, just download it and add information into it. That's how easy it is! Premium templates can easily be customized if you need to make changes.
Some templates could include Microsoft Word timelines. If you find one that includes a Microsoft Word Timeline, easily add your own information to the template. You can also add a Microsoft Word timeline you created to a variety of template types.


Envato Elements is a premium subscription service where you can download as many templates as you need. All the templates are professionally designed to look nice and professional. Envato Elements has more than just templates. They've got fonts, audio, stock photos, and more.
To have access to these digital assets, just subscribe and pay a low monthly fee. Once subscribed, you’ll have access to thousands of high-quality templates.
Let's take a peek at some of the various templates of available on Elements.
5 Best Premium Business Microsoft Word Template
All these timelines have a Microsoft Word timeline in the template or would be ideal for adding a timeline to:
1. Business Plan


This business plan template can have a Microsoft Word timeline added to it. The design of this template is simple, making it easy to edit.
The Business Plan template has two pages in A4 size. Use this template in both Microsoft Word and Adobe InDesign.
2. Corporate Business Flyer Vol.44


This Corporate business flyer is easily editable, so you can add a Microsoft Word Timeline to the template. Here are some highlights:
- A4 size
- modern design
- nice layout
3. Company Profile Word Template


Company Profile Word Template can have a Microsoft Word timeline added to show your company timeline or a budget timeline.
This template comes with sixteen pages in A4 size that are print-ready. Everything in this template can be easily edited, including text, colors, and images.
4. Project Proposal


A Microsoft Word timeline can be used in a project proposal to show how long you expect a project to take or how long the finished project took. Here are some highlights of this template:
- easily editable
- A4 size
- comes with four pages
This template has a nice classic design that'll impress the reader.
5. Business Proposal


In this Business Proposal, you can easily add a Microsoft Word timeline. The timeline could be used to show how long a project will take to complete or how long it'll take to launch a business. This template comes with 22 pages in A4 size and can be used in both Microsoft Word and Adobe InDesign.
How to Make a Timeline in Word Without a Template
Timeline templates can be useful. But you may not have one available. Do you know how to make a timeline in Microsoft Word without a template?
There are two different ways that you can make a Microsoft Word timeline:
- Draw your own timeline.
- Use SmartArt.
Let's learn both methods.
Create a Timeline in Microsoft Word By Drawing an Arrow
To create a timeline from scratch (without a template), let's use a graphic arrow. Let's get started by creating a simple timeline:
1. Create the Arrow
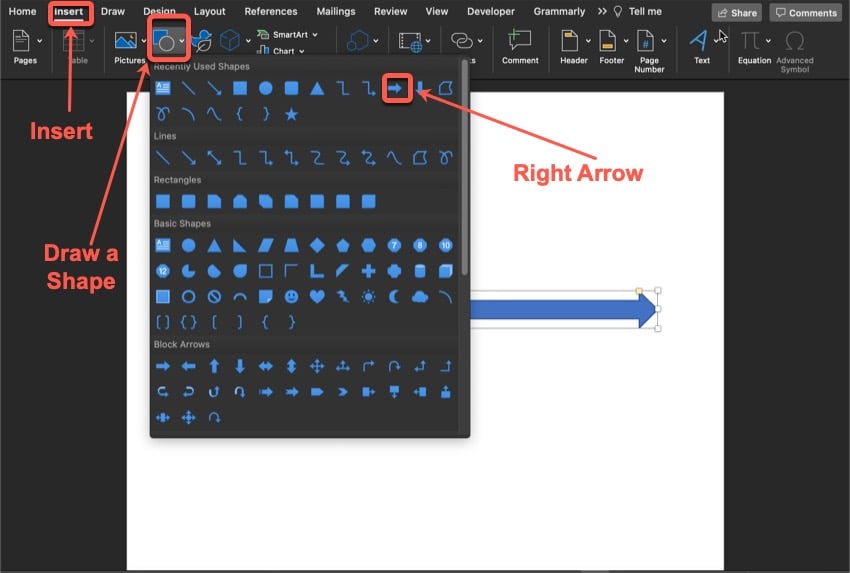


Start with a blank document open in Word. The base of a timeline will be the arrow. To create this base, click on the Insert tab.
In the toolbar, click the Draw a Shape button. When you click on this button, a menu drops down where you can choose what shape you want.
Click on the arrow option and draw a line where you want your timeline to be. Adjust the width and length of the arrow by dragging the handles.
2. Create a Text Box


Part of a timeline is to have points on your timeline that represent events. To create the points, you’ll need to create a text box.
To create a text box, click on the Insert tab. After you click on the Insert tab, click on the Draw a Text Box button in the toolbar.
Now, draw a diagonal line where you want your text box. Then start typing your text.
3. Connect Your Text to Your Timeline


In most timelines, your points are connected to the timeline. To do this, click on the Insert tab.
After clicking on the Insert tab, click on Draw a Shape button in the toolbar. When you click on this button, a menu full of shapes drops down. Click on the line option.


To make the connecting line thicker (or thinner), click on the Shape Format tab. In the toolbar, click on the Format Pane button.
When you click on this button, a sidebar will pop up. Click on the Fill & Line tab. Next, click on the line section of the sidebar. Next, click on the up arrow next to the Width option to make the line thicker.
Your finished timeline should look something like this one:


How to Create a Microsoft Word Timeline With SmartArt
The second method to make a timeline in Microsoft Word is to use a SmartArt timeline. SmartArt has several pre-designed timeline layouts.
Here's how to make a timeline in Microsoft Word using SmartArt:
1. Insert a SmartArt Timeline


Begin by clicking on the Insert tab above the toolbar. In the toolbar under the Insert Tab, click on the SmartArt button.
When you click on the SmartArt button, a menu drops down. From that menu, click on the Process menu option.
2. Choose the Timeline SmartArt Timeline


After you click on the Process menu option another menu drop down, giving you many SmartArt options for timelines.
From the dropdown menu, select the Timeline icon for the Microsoft Word timeline you want to use. In this example, I'll use the basic timeline.
3. Customize the SmartArt Timeline


As you can see, the SmartArt timeline design is already complete. There's no need to draw the various shapes that make up the time.
All you need to do now is customize the timeline as needed by adding the information you need. Here are some various customizations you can make:
- Add text by clicking in the text placeholder and typing your text.
- Change the color of the timeline by clicking on the Change Colors icon in the menu.
- Resize the entire timeline by dragging the handles surrounding the entire timeline to make it smaller or larger.
- Resize a part of the timeline by dragging the handles surrounding that part.
6 Timeline Making Tips for Making Timelines in MS Word
When you're making your timeline, keep these tips in mind:
- Have a plan. Before making your Microsoft Word timeline, plan what you want to include on your timeline and how you want it to look. Start by deciding whether you want your timeline to show future events or past events. Then, think about how detailed you want your timeline to be.
- Be consistent. When you're designing your timeline, it looks better if the timelines in your document have a consistent design with your document. If your document is branded, you'll want to use similar colors and shapes so that your timeline fits with your brand.
- Keep it simple. Also, it's best not to use a lot of colors. A lot of colors can be distracting. A consistent color scheme for the timeline will look more professional.
- Check the size. When you're making your Microsoft Word timeline, make sure your timeline fits on one page. If your timeline is on several pages, it can make the timeline hard to follow.
- Make your points clear. When you're adding point to the timeline don’t abbreviate words. Don’t assume people know what point you're trying to make. If you're making a timeline of events, add actual dates to your timeline.
- Keep it traditional. In English-speaking countries people read from left to right. Therefore, it’s best to make your timeline from left to right. This will make it easy for people to read. (If your document is in a language that reads in a different direction, then follow the traditional direction for that language.)
Common Microsoft Word Questions Answered (FAQ)
Many people use only a fraction of the Word's capabilities. If you're one of those people, it’s okay to ask questions. Here are some common questions with answers:
1. Can I Set the Page Size?
Yes. Setting the page is a way that you can customize a Word documents.
To set the page size, select Layout on the menu bar. Then click the Size icon to choose a page size. A menu drops down showing the various paper sizes. Choose the size you want for your document.
If you don’t see the size you need, click on More Paper Sizes at the bottom of the dropdown menu to create your own. This tutorial explains more about page layout:


2. How Do I Add Page Numbers to my Document?
Page numbers can help you keep your document organized. To insert page numbers, begin by click on Insert. Then click Page Number in the toolbar.
From the dropdown menu choose the option for the location of your page numbers. Learn more in this tutorial:


3. How Do I Set the Margins of Pages in Microsoft Word?
Setting the margins can help you customize your template or document. To set your own margins, begin by selecting the Layout option.
Under the Layout tab, click on the Margins icon. When you click on this button, a menu drops down. Choose a preset margin or select the option at the bottom of the menu to create custom margin settings.
4. Does Microsoft Word Have a Spelling and Grammar Checker?
Yes. Spelling and grammar mistakes can make your document look unprofessional. They can also be distracting for the reader.
To use the spelling and grammar spelling checker, click on the Review tab. Under the Review tab. Then click on the Editor icon in the toolbar. A panel appears on the right that'll take you through your spelling and grammar mistakes and give you the chance to correct them.
For a complete look at how to check spelling and grammar in MS word, study this tutorial:


5. Can I Align Text in Microsoft Word?
Yes. Aligning text can make your document look neater and more professional.
To begin, highlight the text that you want to align and right-click on the highlighted text. A dropdown menu displays. From this menu, click on the Paragraph option. A popup menu appears. Choose a text alignment option in the Alignment field under General.
Find Microsoft Word Templates
Do you want to use Microsoft Word templates? Here are some articles that feature Word templates to make your documents look professional:

 Microsoft Word20 Best Free Microsoft Word Meeting Agenda Templates to Download 2021
 Microsoft WordBest of 2021: 30 Microsoft Office Word Document Templates to Download Now
 Microsoft Word20 Best Free Microsoft Word Business Document Templates (Download 2021)
Learn More About Microsoft Word
Microsoft Word is a very useful tool. Whether you're just starting out with Word or just need a Word refresher, we can help. Check out our guide on how to use MS Word, or study one of the tutorials below:

 Microsoft WordHow to Draw and Use Freeform Shapes in Microsoft Word
 Microsoft WordHow to Create, Open, and Save New Microsoft Word Document Files
 Microsoft WordHow to Quickly Create a Fillable Form in Microsoft Word
Create Your Own Microsoft Word Timeline
Now that you’ve read how to make a timeline in Microsoft Word, use that knowledge in your current project or in your next project.
For an easy and fast method of creating a Microsoft Word timeline, the SmartArt method is the best. But for complete customization, then the method where you create your own timeline from scratch may be the best. Either way, timelines are a really useful way to show the passage of time and highlight certain events.
If you want to use a premium template for other parts of your project, then Envato Elements is a great timesaver. Plus, the right template will help your project look more professional.

No comments:
Post a Comment